Publisher
Start the publisher
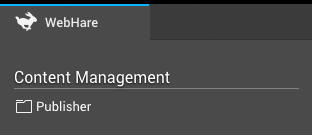
After you login the Publisher application can be found in the Start menu:
Button bar
At the top of the screen the button bar gives access to most often used actions. A complete collection of available actions can be found in the menu on the right of the button bar.
![]()
Greyed-out buttons indicate a (temporarily) unavailable action: you may for instance first need to select a file or folder.
Overview
The screen below the button bar is divided into three parts. On the left the folder tree, in the center the file list and on the right the preview pane.
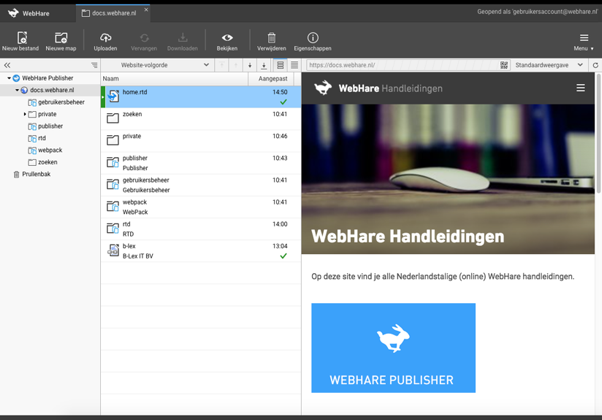
Folder tree
The folder tree show all folders you have access to. Some of these are special folders: in the publisher, a website is also a folder, recognisable by the globe icon. Above the folder three there is a workbar - the << arrows allow you to hide the folder tree, and the button on the right offers access to the bread crumb navigation.
![]()
When the folder tree is hidden, the 'unhide' button and a 'Navigate up' (to a higher level folder) buttons appear.
![]() .
.
Finally context menus are available when your right-click on files or folders.
File list
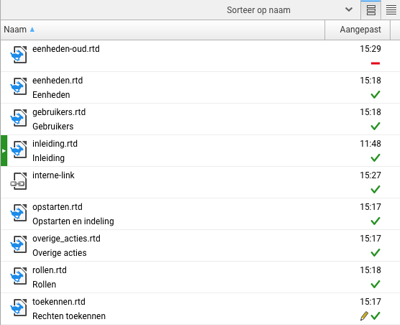
- Index status: the index document of this folder has a green vertical bar
- The file or folder name, used for the URL
- The file or folder title; used to create the website menu and navigation. When you do not fill out a title, in most websites this file or folder is hidden from the menu and navigation.
- Date and time for the last change
- Publication status icon
- Unpublished, saved changes are displayed using a pen icon
Above the file list a work bar is available for some settings. When the view mode is set to "Website order" the "move" buttons (to top, up, down, to bottom) can be used to set the order of the items in the website. Finally you can switch between single or double row layout for the file list.
You can also sort the file list by name or change date - in this view you can not change the web site order.
Preview pane
When a successfully published file is selected, a preview is shown in the preview pane on the right.
Https secured website
Since the WebHare Publisher CMS is a secure https environment the website inside must also be secured. An SSL certificate is always free for WebHare customers!
Above the preview pane you can find the page URL. When you click the QR code logo a QR code is displayed on your screen. You can scan this using your mobile phone. Speaking of mobile phones - the pulldown to the right allows you to choose different screen sizes to get an impression of your website on different devices. A custom screen size can also be set.
Publication Status
The available publication statuses:
![]()
Succesful
The file was published successfuly
![]()
Busy
The file is scheduled for publication. Depending on the server activity this may take a few minutes, but in general it is a matter of seconds.
![]()
Warning
The file was published, but there were errors
![]()
Error
There was an error, the file is not published.
![]()
Not published
The file is not published.
![]()
No publication
Publication is not possible, the file is not within a website with output.
Vóór dit pictogram kunnen extra pictogrammen weergegeven worden die van toepassing zijn op de hoofdstatus:
![]()
Edited
Changes are saved, but not published
![]()
Task
Tasks are set for this file
![]()
Protected
This file is protected and can not be renamed, moved or deleted. Publication can not be changed. Protection is done to prevent problems when performing any of the actions above.
The green bar before one of the files in the folder indicates the index document.
File types
The mosten often used file types are described in this document.
Rich Text Document (RTD)
Most Publisher websites use rich text documents (RTD). Deze documents can be edited, saved and published directly from the Publisher in the Rich Text Editor. This editor is described in a separate manual.
RTD documents are specifically designed to work inside the online Publisher application. They can not be downloaded to your computer.
Image file
Webhare supports most common image files, such as JPG, PNG and GIF. These images can be used in several ways - for site design or as content. Images can also be placed inside a photo album or photo widget folder.
Internal and external link
You can add hyperlinks inside your RTD documents, but links can also be added as files. This is sometimes useful, for instance to use within your website navigation. Opening these files is not possible, but you can change the file by selecting it and choosing "Properties".
Internal links can be used to link to documents within your website. The link will stay intact even when the destination file is moved. External links can be used to point to destinations outside your website.
Actions
Finding files
The easiest way to navigate to a file or folder in you website is by using the "Go to site or URL" function.
- Choose "Go to...", " Go to site or URL" from the menu.
- Type (or paste from your browser URL bar) the location you want to find.
- Click "OK".
The Publisher will navigate directly to the file or folder.
File or folder properties
To change the file properties:
- Select the file or folder you want to change the properties for.
- Click the "Properties" button in the button bar.
- Change the desired properties.
- Click "OK" to save your changes.
Which properties you can change depend on the type of file. For an RTD document the most important properties are:
- Title (used in the website navigation),
- Publication status,
- Restriction settings (you can protect a file from being changed, moved or deleted).
Opening a file
Depending on the type of file an editor can be started to open the file. For example: for RTD documents or WebHare forms an editor will be opened when double clicking the file. An archive file will start the extraction wizard, and custom file types can also open their own editor.
Moving a file
Files can be moved by drag-and-drop, or by using the "Edit", "Move to..." option from the menu.
Changing file order
You can change the order in which files appear on the website (and in the website navigation).
- Make sure the Publisher view is set to "Website ordering"
- Select the file(s) and/or folder(s) you want to change the order.
- Use the up, down, top and bottom buttons:
- The order is immediately updated.
Republish
Even though most websites will update automatically after changing a file or folder, it may be useful to manually force a republication of your entire website to make sure everything is up to date.
To do so, select the website and choose "File", "Republish", "Selected files and folders (Including subfolders)".
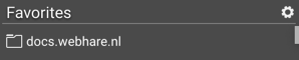
Favorites
When you a complicated website structure or several websites and often work in the same websites or folders, you can add these to your personal "Favorites" menu. To do so, select the website or folder and choose "Show in favorites" from the Publisher menu.
To mange your favorites, use the cogwheel that appears next to "Favorites" when you hover your mouse over it:
Scheduling tasks
You can schedule tasks for a file so it can automatically be moved or deleted, or the publication can be started or ended. To do so, select the file and choose "Properties". Tasks can be set on the "Tasks" tab.
Scheduling publication
To schedule publication it is not necessary to publish the document manually - you can add a new, unpublished file, edit its content in the RTD editor and save (not publish) the document. When you then add a scheduled task to start publication the document will then be published automatically starting at the set date and time.
Restoring a file from Trash
You can restore a deleted file or folder from the trash folder. This folder can be found in the folder tree on the left as one of the bottom elements.
Use the filter to search for your file(s) or folder(s). Select them from the results and choose "Restore" from the context menu (right-click on the selected file(s) or folder(s) to open the context menu).
Personal preferences
You can set several personal preferences for the Publisher applications. These will only be applied to your own WebHare user account.
Choose "Preferences" from the Publisher menu.
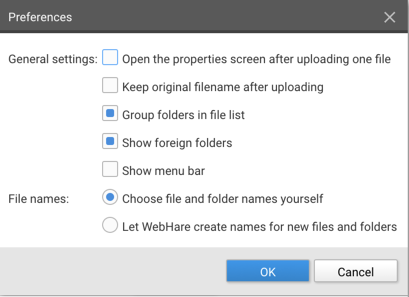
Some of the available options:
- Open the properties screen: this automatically opens the "Properties" screen when you have uploaded a single file.
- Keep original filename after upload: Publisher normally optimises the uploaded file's name for web use by replacing spaces by dashes (among other things). When you choose to keep the original file name the upload file' s name is used unchanged.
- Group folder in file list: this options shows all folders above the files in the folder list when sorting on filename or date.